
Or, why I'm a Sharpie Slut, episode #3.
So.
You may or may not be aware that this year was the Year of the Bathroom here at Mattek Central. And I really mean "year". In January we declared that we would tear down the bathroom and start from scratch. Here it is August and it's still not done.
I have a few photos from early on that I'll treat you to. But really, you don't need to know much more than the tile in the bathroom was peach and rust.
That's right.
I can't make these colors combos up. Take a gander:
 And it gets better! Check out the floor we had going:
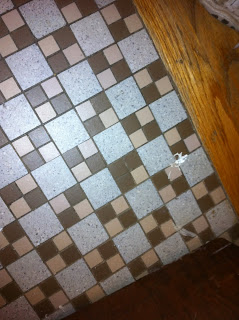
Can you see the spot where the original tile layers missed the pattern? Honestly, we probably lived here for five years before anyone noticed it. I thought about trying to keep the original floor for that little quirk alone, but was able to let go in short order. Brown and pink and gray? No thanks.
So, at one point this is what we were living with:

What? You don't have your throne sitting on 2 x 4s?
Fast forward, like, eight months:
 What was once a tub/shower combo (complete with rotten studs around the old window) is now just a shower. The Boy gave it its maiden voyage this morning, actually. The verdict? Water not hot enough.
Say you: So this is the DYI project? The bathroom?
Say me: Lord, no. The Geek did the lion's share of the re-do and we paid to get the tile installed. I simply painted (one side) of the door.
Little Missy said she did NOT want to get rid of the checkerboard pattern we had on the door before the remodel (it was a light brown and tan). My neighbor had the nerve to suggest magnetic paint would be "fun."
I acquiesced.
Herein lies my first mistake.
Have you ever painted a checkerboard pattern? I mean with black and white paint? And decided it would be Oh-so-fun to make it magnetic? And just for kicks, did a faux technique on top?
Seriously, don't go there.
Biggest. Pain. In. My. Arse. EVER.
The Project
Time required: If you're like me, and put steps off, three days. If you're not like me, it's easily a one-day project.
Materials you will need:
1) Your sanity. Once you acquire that, you will let this go. Should you be unable to locate it, you will also need...
2) Magnetic paint. I used Rustoleum brand, because that's what they had at the store.
3) White latex paint
4) Black latex paint if you're even more anal than me.
5) Glaze and top color for faux technique. Obviously I used the wall color pictured above.
6) Square tool, measuring tape and a light colored pencil for marking your checkerboard pattern
7) Paint brushes, painter's tape, towel for spills, wet rag, old t-shirt, latex gloves
8) Black Sharpie
OK, first of all, magnetic paint isn't actually paint. It's primer. So already you're adding extra steps because you have to paint over it at least once. And because it's black, (the can says it's dark grey, but they lie. It's black.) the painting white over it is troublesome. Secondly, that shit is expensive. Almost 25 bucks for a quart, and believe me when I tell you, you need a lot of it. I went through 3/4 of a can on one side of a door. If you want a wall done, you'll need at least a gallon and probably two.
So, get after it. Start painting! But I'm here to warn you, one coat simply does not do the trick. I painted my door four times to finally get my test magnet to stick. Also you need to MIX the paint well before each application. Why? Because the way they make thepaint primer magnetic is by mixing in iron powder, powder which sinks to the bottom pretty quickly. Because, you know, it's iron. Also, you will not be able to use big, powerful magnets on this paint. Just little ones, like the cheap freebies you get from businesses or magnetized plastic letters.
After you paint prime the door four to five times...
Say you: you said four times.
Say me: I just quit after four times. It probably wouldn't hurt to paint it a fifth time.
...and let it dry, then you get to MEASURE.
YEAH!
Love it.
(ahem)
Before I get to measuring though, one more thing about this damned primer. It doesn't behave like regular latex paint even though it's water based. It takes quite a bit of scrubbing to get it off your hands (and you will get it on your hands) and be prepared to get out the mineral spirits for cleaning the brushes, because soap and water simply doesn't cut it.
Now for measuring:
Grab your measuring tape and measure width and height of the door to figure out how big your squares need to be. Fortunately, my door is 24" x 80", so my squares were an even 8 inches each. I think this is close to standard size. Using your square tool and colored pencil, map out your pattern. Measure twice before you start painting! You would be amazed how those lines can creep on you, even with a good ruler. (I would like to point out that mapping out these lines took forever as I had to re-map three rows.)
Now, take your painters tape, and tape off every other square and start painting your white squares. I would start with one or two just to see how you're doing:
See those white spots? That was me telling myself which squares needed to be which color. It's not a bad idea.
Let dry. Paint round two. Then peel off your painters tape. And curse. Loudly.

For the love of all that is holy in this world, why, why, WHY do I get sucked into buying and using painter's tape? WHY? It never works for me. Ever. I am so good about making straight lines and pressing the tape down so it's nice and firm on the surface and inevitably the damn paint creeps where it's not supposed to go and I have to go back and fix it. It makes me crazy.
The Geek got all clever and suggested I paint the door on a horizontal surface as opposed to leaving the door upright, thereby defying the laws of gravity. In theory, that was an excellent suggestion.
In reality?
 Excellent. Checkerboard as interpreted by Jackson Pollock.
Naturally, I'm forced to fix each and every one of those wonky lines.
I didn't put wine on the list of supplies, did I? I should have.
In retrospect, I probably should not have used paint that was old and required re-hydrating. Better yet, I should have just not re-hydrated the paint, as older, thicker paint would probably have been harder to paint with but not have colored outside the lines.
No matter. I was stuck with an abstract impressionist checkerboard that required immediate attention.
First I tried fixing the lines freehand. Which was an unmitigated disaster. Then I tried a ruler-and-paint-brush method with black paint to fix the spreads:
 That didn't really work very well. I painstakingly painted along the ruler with a detail paint brush. I went through three different rulers, which took 30 minutes, before deciding on one that leaked the least amount of paint while offering the "straightest" line. Which wasn't very straight.
There were color mishaps along the way:

Then the ruler broke:
 At which point I was ready to throw, I don't know, perhaps a gallon of paint at the nearest wall.
I didn't.
But I was still stuck with straggly lines.
Then it hit me.
Hello! Sharpie!! It's permanent ink and really, really dark and dependable and behaves in situations which call for straight lines and, most importantly, is in abundance at my place.
Say you: A Sharpie on a paint project that's going to be on display in your home? Have you no pride?
Say me: None.
It took me about 30 minutes to clean up that mess. I didn't go over every line (I left the ones I had "fixed" with the paint and ruler alone) but I disguised the worst of the lot.* Let me just point out that looking at black and white checkers for any length of time is disconcerting. It almost made me dizzy and when I looked at my kitchen walls after staring at the black and white, I felt like a Merry Prankster.
Since I opted out of painting black paint over the black primerbecause I'm lazy wanted to save some money, I was ready for the final phase. You could, of course, paint the black paint over the black primer. But why? Why had that additional headache of none-working painter's tape producing not-even-close-to-straight lines, when you're just going to add a glaze mixture on top?
Exactly.
Toss the black paint.
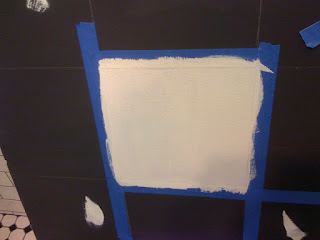
Faux technique:
Mix a glaze to pigment ratio that you can live with. The more pigment (paint) you use, the darker the final color will be. For this I used a 4:1 glaze to pigment ratio.
Dip that old t-shirt in the glaze mixture and start rubbing, then quickly wipe excess mixture away. Work fast because the glaze dries in a hurry. Note the texture on the primer is quite rough and a bit harder to work on. If you want your glaze to be darker, add another layer.
Ta da!

Yes, that little-bitty circle is a magnet. Don't look too closely or you'll see the lines that aren't perfectly straight.
Go ahead. I dare you try this at home. ->
*I've gone back and looked at the door a few times. The places that I didn't fix with my beloved Sharpie drive me crazy. But not crazy enough to take down the door and mend them. So I'm going with the argument that imperfect is good because it's hand-painted. Besides, magnets can mask all those blemishes, right? Right.
So.
You may or may not be aware that this year was the Year of the Bathroom here at Mattek Central. And I really mean "year". In January we declared that we would tear down the bathroom and start from scratch. Here it is August and it's still not done.
I have a few photos from early on that I'll treat you to. But really, you don't need to know much more than the tile in the bathroom was peach and rust.
That's right.
I can't make these colors combos up. Take a gander:


Can you see the spot where the original tile layers missed the pattern? Honestly, we probably lived here for five years before anyone noticed it. I thought about trying to keep the original floor for that little quirk alone, but was able to let go in short order. Brown and pink and gray? No thanks.
So, at one point this is what we were living with:

What? You don't have your throne sitting on 2 x 4s?
Fast forward, like, eight months:

Say you: So this is the DYI project? The bathroom?
Say me: Lord, no. The Geek did the lion's share of the re-do and we paid to get the tile installed. I simply painted (one side) of the door.
Little Missy said she did NOT want to get rid of the checkerboard pattern we had on the door before the remodel (it was a light brown and tan). My neighbor had the nerve to suggest magnetic paint would be "fun."
I acquiesced.
Herein lies my first mistake.
Have you ever painted a checkerboard pattern? I mean with black and white paint? And decided it would be Oh-so-fun to make it magnetic? And just for kicks, did a faux technique on top?
Seriously, don't go there.
Biggest. Pain. In. My. Arse. EVER.
The Project
Time required: If you're like me, and put steps off, three days. If you're not like me, it's easily a one-day project.
Materials you will need:
1) Your sanity. Once you acquire that, you will let this go. Should you be unable to locate it, you will also need...
2) Magnetic paint. I used Rustoleum brand, because that's what they had at the store.
3) White latex paint
4) Black latex paint if you're even more anal than me.
5) Glaze and top color for faux technique. Obviously I used the wall color pictured above.
6) Square tool, measuring tape and a light colored pencil for marking your checkerboard pattern
7) Paint brushes, painter's tape, towel for spills, wet rag, old t-shirt, latex gloves
8) Black Sharpie
OK, first of all, magnetic paint isn't actually paint. It's primer. So already you're adding extra steps because you have to paint over it at least once. And because it's black, (the can says it's dark grey, but they lie. It's black.) the painting white over it is troublesome. Secondly, that shit is expensive. Almost 25 bucks for a quart, and believe me when I tell you, you need a lot of it. I went through 3/4 of a can on one side of a door. If you want a wall done, you'll need at least a gallon and probably two.
So, get after it. Start painting! But I'm here to warn you, one coat simply does not do the trick. I painted my door four times to finally get my test magnet to stick. Also you need to MIX the paint well before each application. Why? Because the way they make the
After you
Say you: you said four times.
Say me: I just quit after four times. It probably wouldn't hurt to paint it a fifth time.
...and let it dry, then you get to MEASURE.
YEAH!
Love it.
(ahem)
Before I get to measuring though, one more thing about this damned primer. It doesn't behave like regular latex paint even though it's water based. It takes quite a bit of scrubbing to get it off your hands (and you will get it on your hands) and be prepared to get out the mineral spirits for cleaning the brushes, because soap and water simply doesn't cut it.
Now for measuring:
Grab your measuring tape and measure width and height of the door to figure out how big your squares need to be. Fortunately, my door is 24" x 80", so my squares were an even 8 inches each. I think this is close to standard size. Using your square tool and colored pencil, map out your pattern. Measure twice before you start painting! You would be amazed how those lines can creep on you, even with a good ruler. (I would like to point out that mapping out these lines took forever as I had to re-map three rows.)
Now, take your painters tape, and tape off every other square and start painting your white squares. I would start with one or two just to see how you're doing:

See those white spots? That was me telling myself which squares needed to be which color. It's not a bad idea.
Let dry. Paint round two. Then peel off your painters tape. And curse. Loudly.

For the love of all that is holy in this world, why, why, WHY do I get sucked into buying and using painter's tape? WHY? It never works for me. Ever. I am so good about making straight lines and pressing the tape down so it's nice and firm on the surface and inevitably the damn paint creeps where it's not supposed to go and I have to go back and fix it. It makes me crazy.
The Geek got all clever and suggested I paint the door on a horizontal surface as opposed to leaving the door upright, thereby defying the laws of gravity. In theory, that was an excellent suggestion.
In reality?

Naturally, I'm forced to fix each and every one of those wonky lines.
I didn't put wine on the list of supplies, did I? I should have.
In retrospect, I probably should not have used paint that was old and required re-hydrating. Better yet, I should have just not re-hydrated the paint, as older, thicker paint would probably have been harder to paint with but not have colored outside the lines.
No matter. I was stuck with an abstract impressionist checkerboard that required immediate attention.
First I tried fixing the lines freehand. Which was an unmitigated disaster. Then I tried a ruler-and-paint-brush method with black paint to fix the spreads:

There were color mishaps along the way:

Then the ruler broke:

I didn't.
But I was still stuck with straggly lines.
Then it hit me.
Hello! Sharpie!! It's permanent ink and really, really dark and dependable and behaves in situations which call for straight lines and, most importantly, is in abundance at my place.
Say you: A Sharpie on a paint project that's going to be on display in your home? Have you no pride?
Say me: None.
It took me about 30 minutes to clean up that mess. I didn't go over every line (I left the ones I had "fixed" with the paint and ruler alone) but I disguised the worst of the lot.* Let me just point out that looking at black and white checkers for any length of time is disconcerting. It almost made me dizzy and when I looked at my kitchen walls after staring at the black and white, I felt like a Merry Prankster.
Since I opted out of painting black paint over the black primer
Exactly.
Toss the black paint.
Faux technique:
Mix a glaze to pigment ratio that you can live with. The more pigment (paint) you use, the darker the final color will be. For this I used a 4:1 glaze to pigment ratio.
Dip that old t-shirt in the glaze mixture and start rubbing, then quickly wipe excess mixture away. Work fast because the glaze dries in a hurry. Note the texture on the primer is quite rough and a bit harder to work on. If you want your glaze to be darker, add another layer.
Ta da!

Yes, that little-bitty circle is a magnet. Don't look too closely or you'll see the lines that aren't perfectly straight.
Go ahead. I dare you try this at home. ->
*I've gone back and looked at the door a few times. The places that I didn't fix with my beloved Sharpie drive me crazy. But not crazy enough to take down the door and mend them. So I'm going with the argument that imperfect is good because it's hand-painted. Besides, magnets can mask all those blemishes, right? Right.
4 comments:
Wouldn't an outhouse be easier and cheaper?
I buy frog tape (the green painters tape) AND I usually paint clear polyurethane OVER the tape to seal it to the surface. I've had some good results. It seems like a lot of steps, but it usually pays off in not driving you effing insane. ;)
Okay, I'm confused. Why did you think you wanted a magnetic door for your bathroom. My niece has one for her closet in her bedroom, but...
WOW what a lot of work! It's people like you that convince me I should never attempt to do these things 'cuz I would never take the care and attention to detail that you do.
Well it is simply exquisite and classy looking - Your bathroom could be put in a design magazine - worth all your hard work and mistakes - IMPOSSIBLE to paint without mistakes. I have NEVER painted without have to fix mistakes and clean up messes! Anyway, you might consider Mitch taking pictures of the bathroom with his fancy camera and sending them to a design magazine. I bet that will get published. lu mom
Post a Comment